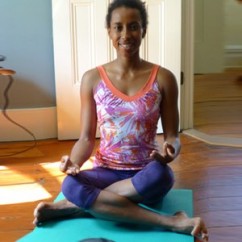
Lotus Pose or the Padmasana where “padma” means lotus and “asana” means pose, hence is called Lotus Pose. It forms the base of many yoga asanas or poses primarily the pranayams. This pose is all about calming your mind so that you can reap the full benefits of the pose to be performed. In this pose you have to sit in a particular posture, keeping your back erect and keeping your hands on your knees while the palm faces the sky.

Lotus Pose Meaning
This pose is the main sitting posture in a meditation. This pose originated from India, where most saints sit in such way to meditate for really long time. It helps in calming the mind, bringing mental stability, improves concentration, restores energy levels in the body and the list just goes on. This particular yoga posture helps in making meditation even more fruitful. A regular practice of Lotus Pose helps in overall development of oneself; thus blossoming like a lotus.
Also read : Sudarshan Kriya Yoga (SKY) – For Peace & Harmony
Lotus Pose Variations
Once you have attained the perfect Lotus Pose, you can try out the variations in the pose. You may or may not do the variations but when you do just make sure that you have attained the Padmasana PERFECTLY without pain in any parts of your body. There are many variations of Lotus Pose. Here, we bring to you 5 of them.
1. Accomplished Pose : This pose is somewhat opposite to the Lotus Pose. Place your left foot under right thigh. And put your right foot under your left knee. If this pose seems too tight for you, you may loosen up a bit as shown in the figure. Place some cushions under your knees to make this pose more comfortable and easy-to-do.

Also read : Benefits Of Vajrasana Pose – How To Do Vajrasana?
2. Double Pigeon Pose : You need to accomplish the Accomplished Pose firstly before proceeding to this variation. Then elevate both of your knees. This pose might get you lower body too tensed. To help it relax, you can gently slide cushions under your knees and thighs as per requirements.

Also read : Yoga Asanas and Pranayamas To Get a Glowing Skin Naturally
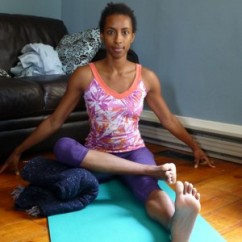
3. Seated Ankle To Knee Pose : In this variation of Lotus Pose, stretch both your legs to the front parallelly. Gently fold one leg at the knee and place it on the other knee as shown in the picture below. Keep your back straight and gain some support with the help of your hands. You may use the palm or fingers to get the required support. Make sure your hands are by your side and not behind you. This ensures your spine to be kept straight. And just like in the pose before, you may use a blank or cushion as a support below the elevated knee.

Also read : 8 Powerful Yoga Asanas To Boost Your Stamina
4. Supported Head To Knee Pose : When you are done with the seated ankle to knee pose, this is the next stage of this pose. Bend forward (keeping your spine straight) and place both your hands on either side of your ankle for support.

Also read : 15 Powerful Yoga Asanas To Get Rid Of Belly Fat
5. Supported Bound Angle Pose : For this pose, join your feet. Bend your legs at the knees and bring the joined feet close to your body. You may use cushions as a support and place it just below your knees.

Lotus Pose benefits
The benefits of Lotus Pose are:
- Improves digestion.
- Relaxes the mind.
- Improves concentration.
- Helps during pregnancy by opening up the hips.
- Reduces menstrual discomfort.
- Helps controlling blood pressure.
- Helps in bringing peace of mind.
- Stretches the ankle and knees.
- Helps develop a good posture.
- Keeps joints and ligaments flexible.
- Restores energy levels in the body.
- Keeps the spine straight.
- Helps in better blood circulation.
Also read : Yoga Asanas To Increase Memory Power
Lotus Pose For Beginners
For beginners, this pose can be really very tough and painful as your heel will appear to pierce your thigh. I have gone through the same phase myself. But within a couple of days the pain will vanish and Padmasana becomes a pure bliss. If you’re a person who does regular exercise, then this pose will be a piece of cake for you. Otherwise, make sure not to strain yourself. Rather, you can do the Ardh-Padmasana(Half-Lotus Pose) i.e. you criss cross either of the legs and leave the other one. When you get accustomed to one leg, then try the purna-Padmasna(Complete- Lotus Pose) i.e. with both the legs. Remember to keep your hands on your knees with palms facing upwards.
Also read : Yoga Styles and Yoga Poses For Starters [Infographic]
Lotus Pose Knee pain
Knee pains are such a nuisance. It comes into the way of literally everything. You cant walk around too much with the pain. Nor can you shop or do household chores. So if you have any sort of knee pain, do go for proper expertise guidance even when you go for the simplest Lotus Pose.
Also read : 7 Yoga Poses For Attaining Your Dream Buttocks
How to do Lotus Pose?
In order to do Lotus Pose, sit on the ground. Fold your legs. First place your right foot is placed on the left thigh and left foot on the right thigh or vice versa. Meanwhile place your hand on your knees with palms facing upwards. Hold this pose for about 5-10 minutes. This pose helps in calming the mind, improving posture, digestion and a lot more. The benefits of this pose are elaborated in the next segment of this post.
Also read : How Yoga Transforms Your Body – A Complete Guide
Lifted Lotus Pose

The Lifted Lotus Pose is basically taking this pose to a next level. Firstly, sit on the ground in Padmasana. Make sure your ground is firm enough to support the pressure you’ll be exerting. Place both your palms on the ground. Bring them closer to your hips. Gently push yourself up with the help of your hands. It’s practically impossible to attain this pose on the first go. But regular practice will help you attain it in no time. Try to hold the pose for a while. Also read : Yoga For Beginners – Choose Your Yoga Style Now [Flow Chart]
Benefits of Lifted Lotus Pose
- It helps in strengthening the muscles of the abdominal organs.
- Improves the intestinal system.
- Treats digestive disorders.
- It is a wonderful exercise for toning up your arms.
- It also helps in strengthening the wrist, elbows and shoulders.
If you have hurt your wrist in the past, please do not try Lifted Lotus Pose.
Also read : Yoga to Reduce Hair Fall
Lotus Pose Stretches
How to avoid injuries in Lotus Pose?
Also read : Quiz : How Much Do You Know About Yoga?
That would be all from us on Lotus Pose / Padmasana . We have involved every bit of information known to us here. If you think you know something more, you are more than welcome to share them with us in the comments below.
